This is an updated blog entry. I first posted it on my old and discontinued blog at blog.com for Citrix NetScaler 10, this one is for Citrix NetScaler 11.
We all know how to get a private Certificate for free: You just have to set up a Windows Server, add a role, select certificate authority. That’s it. However these Certificates are not trusted by any browser, even worse: they are not trusted by our Citrix Receiver too, and therefore it’s impossible to connect to a Citrix XenDesktop of Citrix XenApp server without additional interaction. We have to add the root certificate into our client’s machine. This is not a big issue for a administrator, but it is a big challenge for a normal user. That’s why I prefer to use trusted certificates with my NetScaler: No troubles with untrusted workstations and uneducated users.
Unfortunately certificates are really expensive.
There are several classes of certificates. The higher the level, the more trustworthy, the more expensive. I quote Wikipedia about levels:
Vendor defined classes
VeriSign uses the concept of classes for different types of digital certificates:
- Class 1 for individuals, intended for email.
- Class 2 for organizations, for which proof of identity is required.
- Class 3 for servers and software signing, for which independent verification and checking of identity and authority is done by the issuing certificate authority.
- Class 4 for online business transactions between companies.
- Class 5 for private organizations or governmental security.
Other vendors may choose to use different classes or no classes at all as this is not specified in the PKI standards.
Which level would be suitable for our NetScalers? This is the wrong question. From the technical point of view there is no difference between a 650€ (currently this are in about 800$) per year certificate and a free one. Which certificate would you trust? That’s the question.
My answer would be: It depends. I don’t like inexpensive certificates presented by websites. I stop credit card payments if I see certs like that, simply because I can not trust the certificate, presented by this website. On the other hand, if I know my company uses a cheep certificate I would not hesitate using it. So I don’t care about the level of trust for a NetScaler Gateway certificate in a low to medium security environment.
So let’s find the cheapest certificate on the market. The cheapest one is the best for my purpose, as long as it is trusted. And there are free ones available! The Israeli company StartCom gives level 1 certificates for free. Level 2 certificates would be not too expensive too, but I don’t care of these levels. Maybe I would do if I would let foreign users access my infrastructure. Some of my customers buy their certificates from more trustworthy companies like VeriSign. However these certificates cost some hundred Euro.
A NetScaler may contain several Certificates. I think it’s beneficial to keep a naming scheme. We will have to create 3 files:
- The private key
- The Certificate signing request (CSR)
- The certificate
You may update your certificate every year using the same key and CSR, or you may create new keys and CSRs every time you have to renew your certificate. I create new keys every time so I go with this naming scheme:
- key: FQDN-year.key (i.e.: gateway.norz.at-15.key)
- CSR: FQDN-year.csr (i.e. gateway.norz.at-15.csr)
- certificate: FQDN-year.cert (i.e. gateway.norz.at-15.cert)
Even though this blog post refers to StartCom you may use a similar procedure with any other certification authority.
So how can I get a certificate from StartCom?
This step will be different between certificate authorities! You’ll have to find out how to deal with your vendor and skip to Requesting a server certificate.
First, we have to register with StartCom. So let’s surf there!

Time is money! So let’s use the express lane! (sorry, this text first was in German, my widows is German, so some of my screen shots are in German too.
The first thing to do: StartCom has to trust us. If they trust us they give a personal certificate to us. And this certificate is used to log on to the certificate authority.
StartCom will send a confirmation mail to the mail address provided. Here is a screen shot:

We copy this authentication code into the StartCom website to continue

The first step is almost done: StartCom will create a certificate for us and we have to agree to install it:


First part is finished: Our StartCom account is created successfully, StartCom has chosen to trust my requests!
Validating our domain
StartCom has not only to trust me (the admin), but also to make sure I am responsible for the domain, so we have to follow a rather simple procedure:
Anyone would be able to say: I’m the owner of Citrix.com. So StartCom has to find out if this is true. The procedure used is a rather rudimentary one. In fact the simplicity of the procedure is the reason why this certificates are for free.
First, let’s tell them the name of our domain. Not the name of the server, just the name of the domain! My Gateway’s name should be netscaler.norz.at, but my domain is norz.at, so I add norz.at here.

They’ll check the domain registration information and find email addresses related to this domain name registration. There are some generic ones too.

They will send a mail to one of these given addresses. The one able to receive this mail has to be the responsible person. This is a simple trick, but it does not look 100% save to me. No matter, it is save enough to get a certificate, and that’s what we want to get, don’t we?

So this is the verification mail, including the verification code. We add this code into the website and got our domain verified.


Finished: We can now request our certificate for netscaler.norz.at!
Requesting a Server Certificate
So let’s log on to our NetScaler appliance. You should have changed it’s initial credentials (if you have not done so, do it!)
NetScaler default settings would be: 192.168.100.1/16, both username and password are nsroot

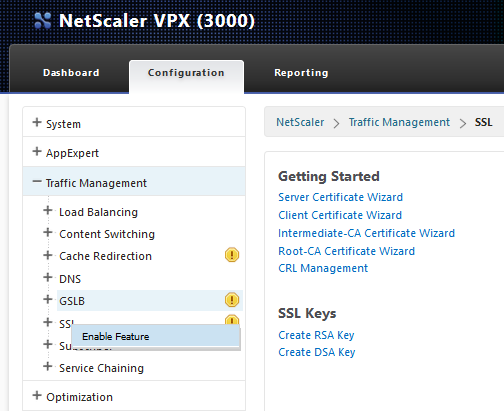
Enable the SSL- Feature.
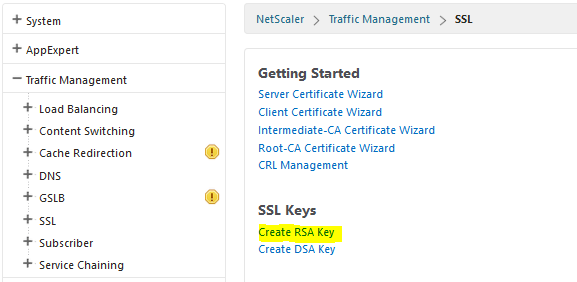
Next to do: We have to create the key for our certificate.
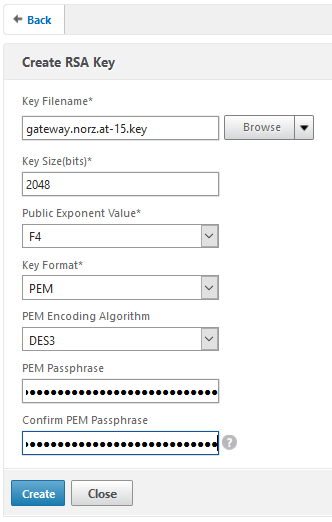
Our certificate should be a 2048 Bit certificate (1024 is not enough for security reasons, and more than 2048 neither makes any sense [it will dramatically slow down the number of SSL transactions per second of our NetScaler] nor is it supported by StartCom). Be sure to use a tricky password, it may be up to 31 characters. This password is needed to get access to the Holy Grale of SSL on your netscaler: your private key. So keep away from passwords like 123456, Password1 or P@ssw0rd! Be creative! I use a password generator. Put this password into your documentation, you’ll need it during your next steps!
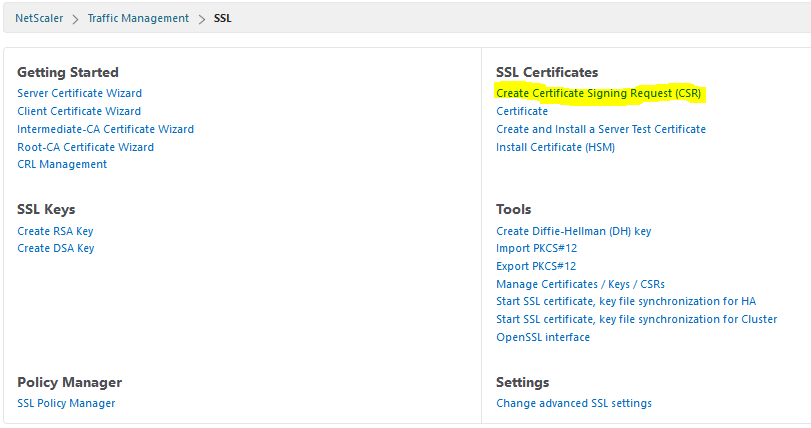
We have to create a certificate signing request for this key after creating the key.
If you don’t use startcom you’ll have to be rather careful to provide correct information, especially be sure to add the correct Common Name: The common name is the fully qualified domain name of your host, in my case: netscaler.norz.at.
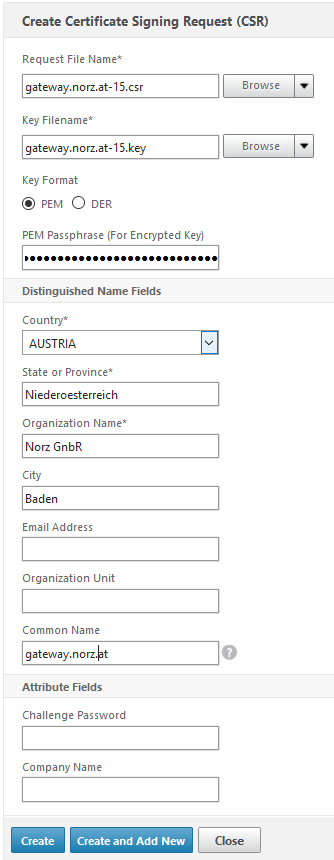
The passphrase is the password from above. Be sure to select PEM, as our key is a PEM key!
These Distinguished Name Fields are ignored by StartCom but essential for other certification authorities.The most important one is the Common Name. This is the name of the server this certificate gets created for.
Any typo in common name will cause your certificate to be unusable, so be careful!*
(* startcom ignores this part of the certificate request)
You should skip the Challange Password and the Company Name as some CSs can’t deal with it!
Next step: download the signing request. We could use a tool like WinSCP, or use the NetScaler GUI. It will be located at /flash/nsconfig/ssl. I’ll use the NetScaler GUI to download this file!


Select the certificate signing request and download it. This request has to be brought to the certificate authority.
If you click on download the file opens abnd will look like that:
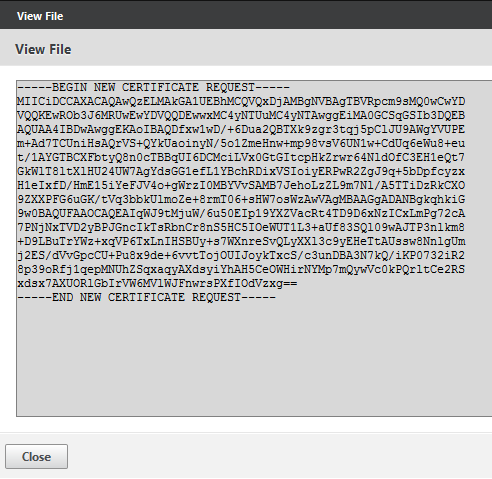
Be sure to select all of the file and copy the complete request, including the “begin …” and “end …”, into your clipboard ([Ctrl]A [Ctrl]C).
Requesting the certificate
So let’s go back to StartCom and request our Certificate! We’ll request a server certificate. If you use a different CA you’ll have to find out how to deal with them and proceed to importing your certificate!

skipp the key generation (we already have generated a key, and it’s included in our CSR)

and paste our self Certificate Signing Request key here:

Startcom has recieved our request.

We’ll have to provide additional information StartCom ignores these distinguished fields. First of all we have to select the name of the domain:

next the name of the host, mines name will be netscaler

This certificate is valid for 2 hostnames: norz.at and netscaler.norz.at. This is normal for StartCom as certificates are normally used for web servers like https://192.168.200.109. The host name www may be skipped in many cases, so https://192.168.200.109 would be valid too.

Our certificate is a simple text file. It gets transferred via clip board. Just paste it into your notepad and save it with an extension of crt.

So we’re done with it! Our Certificate is created. Caution: don’t forget to download the intermediate certificate! We’ll have to upload it to our NetScaler later on!
We can see our certificate if we doubleclick it …

So you see, this is a certificate had been issued to a host called netscaler.norz.at, it is created by StartCom class 1 Intermediate CA, valide from February 6th 2013 to February 8th 2014

As mentioned above, this certificate is not created by the primary StartCom CA, but by a inferior CA called StartCom Class 1. This is normal behaviour, but it causes some pain: Our certificate won’t be trusted by some browsers and some Client OS. It will work with Internet Explorer on Windows (and this is sufficient for in about 30% of our users). Because of this we’ll have to do a little trick: We have to add the intermediate CA into our chain to get our certificate fully trusted.
Importing the certificate into NetScaler and installing the newly created Certificate
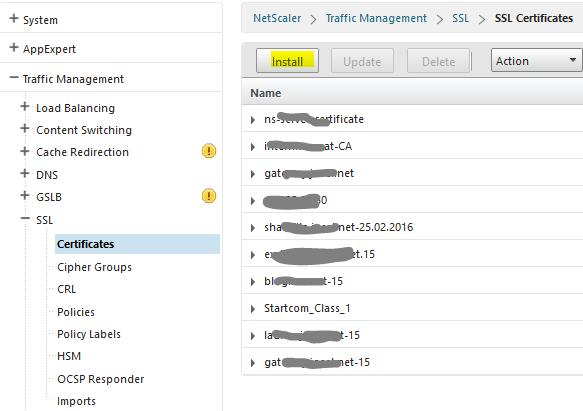
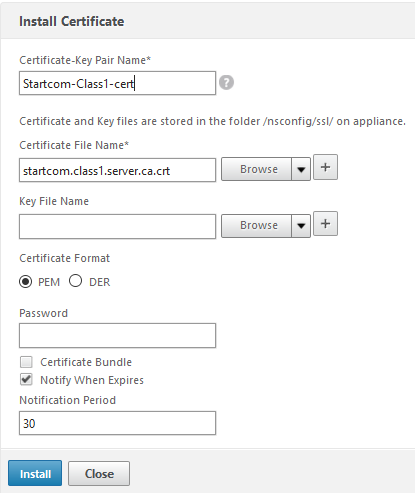
Click Install
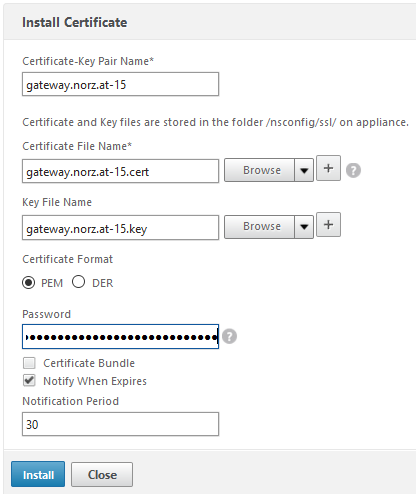
Give your certificate a name. Click the arrow next to Browse to browse locally for your certificate, browse the appliance for the key. Add the key’s password, our certificate is PEM- encoded. If you want to you can add a expiry notification, NetScaler will send a trap to it’s trap destination. I think it’s also clever to add a reminder into your Outlook, so you won’t forget about the expiry of your certificate!
Click Install.
Next step: Install the Intermediate CA- certificate into your NetScaler and link these certificates. You’ll have to repeat this step if there are more than just one intermediate CA. You may have a look at this two Citrix- knowlege base articles: CTX114146 and CTX136023 for certificate bundles (certificates including the certificate and all CA certs).
Startcom’s intermediate certificate is a bit hard to find. If you failed to download it while downloading your certificate you’ll have to look for it. It’s not that easy, so I provide a link to you. You’ll have to click on Intermediate CA Certificates and download the Class 1 intermediate CA certificate.
We’ll leave “Key File Name” blank as we don’t have a key file (and Startcom won’t give it to us), same about the password.
We have all our certificates installed. Now we’ll have to link our Certificate to it’s intermediate certificate. To do so: select the newly created server certificate, click it with your right mouse button and click “link”
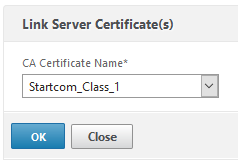
select the intermediate CA’s certificate and click OK. That’s it: our certificate is valid for FireFox, Crome, Safari and many more browsers.
I hope you liked it. Please link to this blog if you think it is useful
Thanks
Johannes
Hi! Use https://letsencrypt.org/ =)
Thank you so very much! Seems to be interesting, however – on first look – a bit more complicated than StartSSL as you have to install a client. I’ll take a look at it, and write a blog about how to use it if it’s worth while 🙂
Unfortunately let’s encrypt gives only certificates for a view days. There is an automatic renew procedure, however it doesn’t work for a NetScaler
Excellent, this has helped fix my certificate issues.
These real world examples are always way better than the generic support offered by Citrix and Symantec
Thanks, matt. I like comments like yours
thank you for sharing